How to Register on NBI Clearance Online Portal 2026: Complete Step-by-Step Guide
Quick Answer:
To register on the NBI Clearance Online Portal in 2026, follow these simple steps:
1. Visit the official website of the National Bureau of Investigation.
2. Click Register (for new applicants).
3. Enter your email, create a password, and verify your account.
4. Fill out your personal details correctly.
5. Choose your preferred NBI branch and appointment date.
6. Select a payment method and pay the fee.
7. Go to your appointment for biometrics and photo capture.
That’s it. After your appointment, you’ll receive your NBI Clearance (same day if no “hit”).
Registering on the NBI Clearance Online Portal is the first step to getting your clearance in 2026. Whether you need it for employment, travel, visa processing, business registration, or other legal purposes, the online system makes the process faster and more convenient.
This step-by-step guide explains how to create an account, book an appointment, pay the fee, and complete your NBI clearance application without confusion.
Why Register Online for NBI Clearance?
Registering online with the National Bureau of Investigation makes the process easier and faster.
No Long Lines
- No need to wait for hours at the branch
- Register from home or office
- Available anytime (24/7)
Choose Your Appointment
- Pick your preferred branch
- Select date and time
- Book in advance for better planning
Faster Processing
- Your details are already in the system
- Less typing at the branch
- Faster photo and fingerprint capture
Easy Payment Options
- Pay using GCash, online banking, 7-Eleven, and more
- Pay before your appointment
- Get payment confirmation instantly
Track Your Application
- Check your status online
- Get email or SMS updates
- Know when your clearance is ready
Before You Start: What You Need
Prepare these details before registering:
Personal Information
- Full legal name (as on birth certificate)
- Date and place of birth
- Civil status (Single, Married, etc.)
- Gender
- Citizenship
Contact Information
- Active email address (for login)
- Mobile number (for updates)
- Complete home address
Physical Details
- Height (cm)
- Weight (kg)
- Eye color
- Hair color
- Complexion (Fair, Light Brown, Medium Brown, etc.)
- Visible marks like scars or tattoos (optional)
Purpose of Application
- Employment (local or abroad)
- Visa
- Travel
- Business
- Other
Valid ID
You don’t need it during online registration, but bring a government-issued ID on your appointment day.
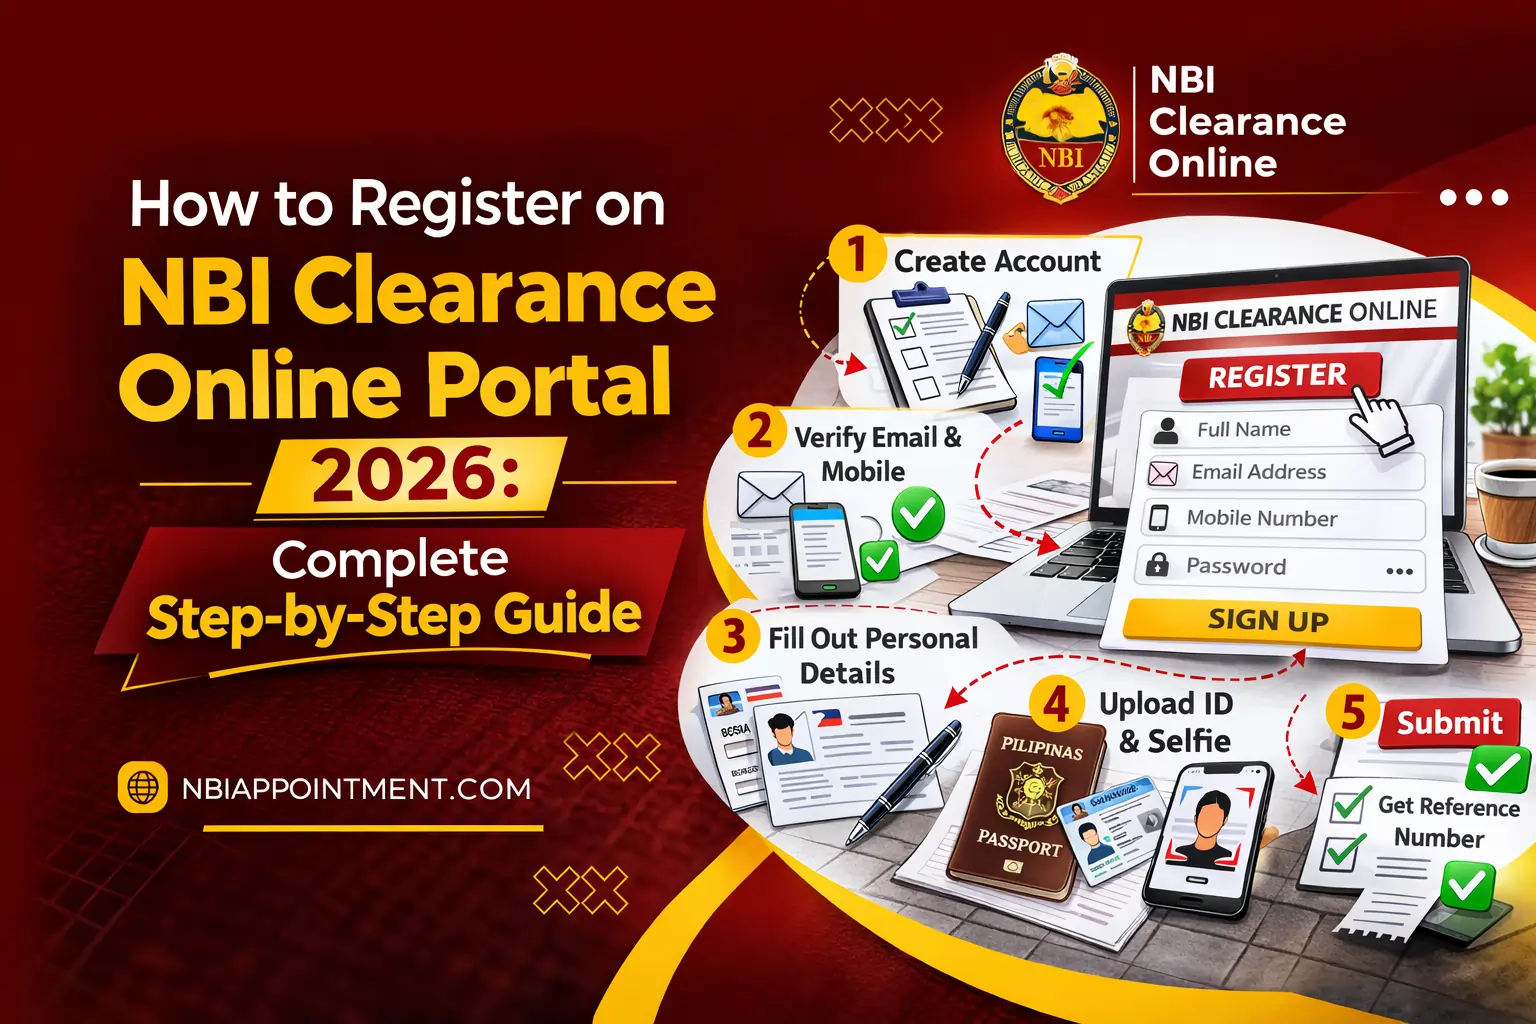
Step-by-Step Guide: How to Register on NBI Clearance Online Portal (2026)
This simple guide will help you create an account, book an appointment, and complete your NBI Clearance application without confusion. Follow each step carefully and double-check your details before submitting.
Step 1: Go to NBI Official Website
Website: https://clearance.nbi.gov.ph
⚠️ IMPORTANT – Verify Official Website:
- Must end with
.gov.ph(NOT .com, .net, .org) - Look for https:// (secure connection)
- Check for government seal/logo
Beware of Fake Sites:
- Many scam sites copy NBI design
- They steal your personal information
- ONLY use clearance.nbi.gov.ph
On Homepage You’ll See:
- “Sign In” button (for existing accounts)
- “Register” button (for new accounts)
- Application status checker
- FAQs and announcements
Step 2: Click “Register” for New Account
Are You a First-Timer or Renewal?
FIRST-TIME APPLICANT:
- Never had NBI clearance before
- OR: Last NBI clearance was before 2014
- → Click “Register” → Select “NO” when asked about old clearance
RENEWAL APPLICANT:
- Had NBI clearance issued 2014 or later
- Have old NBI clearance number
- → Click “Sign In” → Select “YES, I have old clearance”
- System will find your old record
For This Guide: We’ll focus on FIRST-TIME registration. If renewing, the process is similar but with pre-filled information.
Step 3: Fill Out Registration Form
Section 1: Account Information
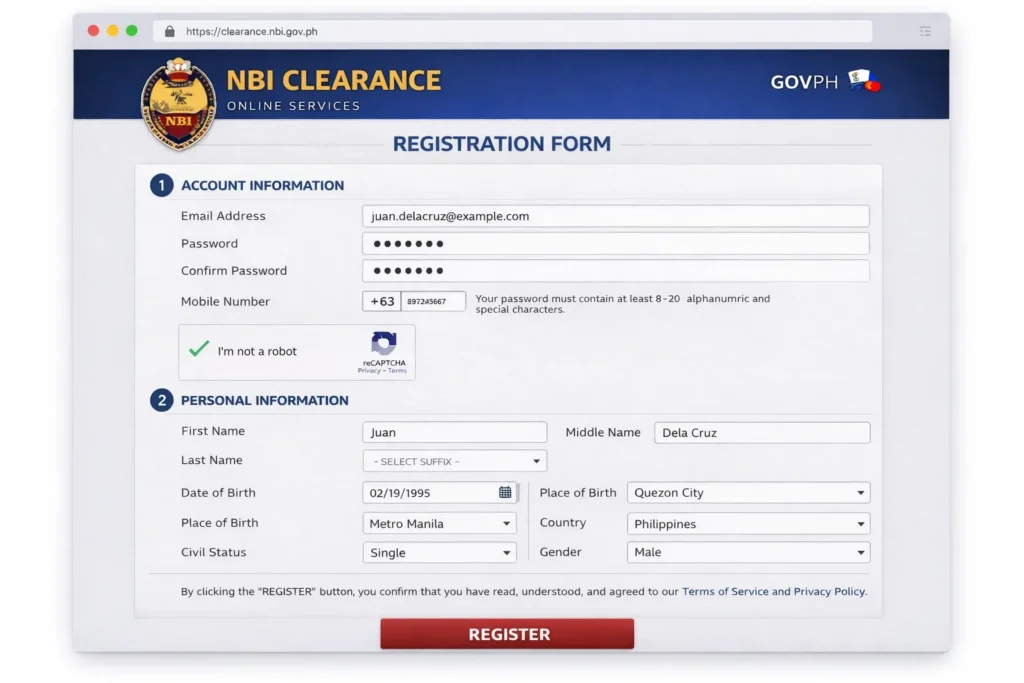
Email Address:
- Use a valid email you check regularly
- This becomes your username for logging in
- You’ll receive confirmation email here
- Example: yourname@gmail.com
Password:
- Create a strong password (8+ characters)
- Must include: letters, numbers, special characters
- Example: MyNbi2026!
- Write this down! You’ll need it to log in
Confirm Password:
- Re-enter your password exactly
- Must match the first password field
Mobile Number:
- Format: 09XXXXXXXXX (Philippine number)
- You’ll receive SMS updates about your application
- Example: 09171234567
Section 2: Personal Information
Full Name:
- First Name: As written in birth certificate
- Middle Name: Full middle name (or mother’s maiden surname)
- Last Name: Surname/family name
- Suffix: Jr., Sr., II, III (if applicable)
Example:
- First: Juan
- Middle: Santos
- Last: Dela Cruz
- Suffix: Jr.
⚠️ IMPORTANT:
- Use EXACT spelling from birth certificate
- No nicknames (not “Jun” if birth cert says “Juan”)
- Include all middle names if you have multiple
- Suffix matters (Jr. vs Sr.)
Date of Birth:
- Select from calendar or type
- Format: MM/DD/YYYY
- Example: 02/19/1995
- Must be accurate (checked against birth certificate)
Place of Birth:
- City/Municipality: Where you were born
- Province: Province of birth city
- Country: Philippines (or foreign country if born abroad)
Example:
- City: Quezon City
- Province: Metro Manila
- Country: Philippines
Civil Status: Select from dropdown:
- Single
- Married
- Widowed
- Separated
- Divorced (if applicable)
Gender:
- Male
- Female
Citizenship:
- Filipino
- Foreign (if dual citizen or foreigner)
Section 3: Current Address
Complete Residential Address:
- House/Unit Number: Your house/building number
- Street Name: Complete street name
- Subdivision/Barangay: Subdivision or barangay name
- City/Municipality: Your current city
- Province: Province of your city Zip Code: Postal code
- Country: Philippines (or current country of residence)
Example:
- House #123
- Street: Avenida Street
- Barangay: Barangay Milagrosa
- City: Quezon City
- Province: Metro Manila
- Zip: 1109
- Country: Philippines
⚠️ TIP: This address should match your valid ID if possible.
Section 4: Physical Description
Height:
- Enter in centimeters (cm)
- Example: 165 cm (5’5″), 170 cm (5’7″), 180 cm (5’11”)
- If unsure, estimate closely
Weight:
- Enter in kilograms (kg)
- Example: 60 kg (132 lbs), 70 kg (154 lbs), 80 kg (176 lbs)
- Approximate is fine
Eye Color:
- Black
- Brown
- Blue
- Green
- Gray
- Hazel
- Other
Hair Color:
- Black
- Brown
- Blonde
- Red
- Gray/White
- Other
Complexion: Select from 7 options:
- Fair (very light skin)
- Light Brown (light tan)
- Medium Brown (mid-range brown)
- Dark Brown (deeper brown)
- Very Dark (deep brown to very dark)
- Black (darkest skin tone)
- Yellow (yellowish undertone)
Most Filipinos select: Light Brown or Medium Brown
Identifying Marks (Optional):
- Visible scars, moles, birthmarks, tattoos
- Location and description
- Example: “Scar on left forearm, 2 inches”
- Leave blank if none
Section 5: Purpose of Application
Select primary reason for getting NBI clearance:
Common Options:
- Employment (Local)
- Employment (Abroad)
- Visa Application
- Travel Abroad
- Business Permit/Licensing
- School Requirements
- Immigration
- Adoption
- Firearms License
- Government Requirements
- Other (specify)
Choose the most relevant purpose. If multiple purposes, select the primary one.
Step 4: Review and Verify Information
CRITICAL – Double-Check Everything:
- Name Spelling: Matches birth certificate exactly?
- Date of Birth: Correct month, day, year?
- Address: Complete and accurate?
- Email: Correct and active?
- Mobile Number: Philippine number, 11 digits?
- Physical Details: Reasonable estimates?
Common Mistakes to Avoid:
- Typos in name (very hard to correct later)
- Wrong birthdate (causes “hit” issues)
- Inactive email (you won’t get confirmation)
- Wrong mobile number (no SMS updates)
If Everything is Correct: Click “Submit” or “Register”
Step 5: Verify Your Email Address
What Happens Next:
After clicking Submit, you’ll see: “Registration successful! Please check your email to verify your account.”
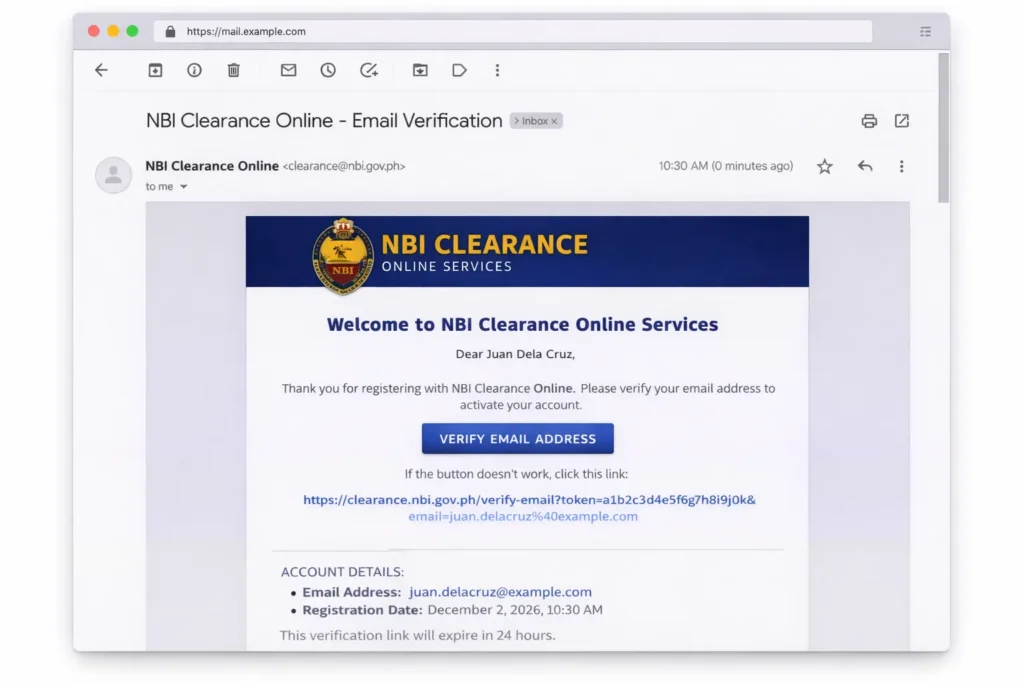
Check Your Email Inbox:
- Look for email from: clearance@nbi.gov.ph or noreply@nbi.gov.ph
- Subject: “NBI Clearance Online – Email Verification” (or similar)
- Check SPAM/JUNK folder if not in inbox!
Email Will Contain:
- Welcome message
- Verification link (clickable)
- Your registered email address
- Instructions to complete verification
Click the Verification Link:
- Opens browser
- Confirms your email is valid
- Activates your account
- You’ll see: “Email verified successfully!”
⚠️ Verification Link Expires:
- Usually valid for 24-48 hours
- If expired, request new verification email
- Go to NBI portal → “Resend Verification Email”
Step 6: Log In to Your Account
Return to: https://clearance.nbi.gov.ph
Click “Sign In”
Enter:
- Email Address: The email you registered with
- Password: The password you created
- Verification Code: Type the CAPTCHA shown
Click “Log In”
You’re Now Logged In!
- You’ll see your Dashboard
- Welcome message with your name
- Options to: Apply for Clearance, View Applications, Check Status
How to Schedule NBI Clearance Appointment Online
Once logged in, continue with your application:
Step 7: Start New Application
Click “Apply for Clearance”
Your Information Pre-Filled:
- Name, birthdate, address (from registration)
- Review and confirm it’s correct
- Update if anything changed
Select Application Type:
- New Application (first time)
- Renewal (if you indicated old clearance)
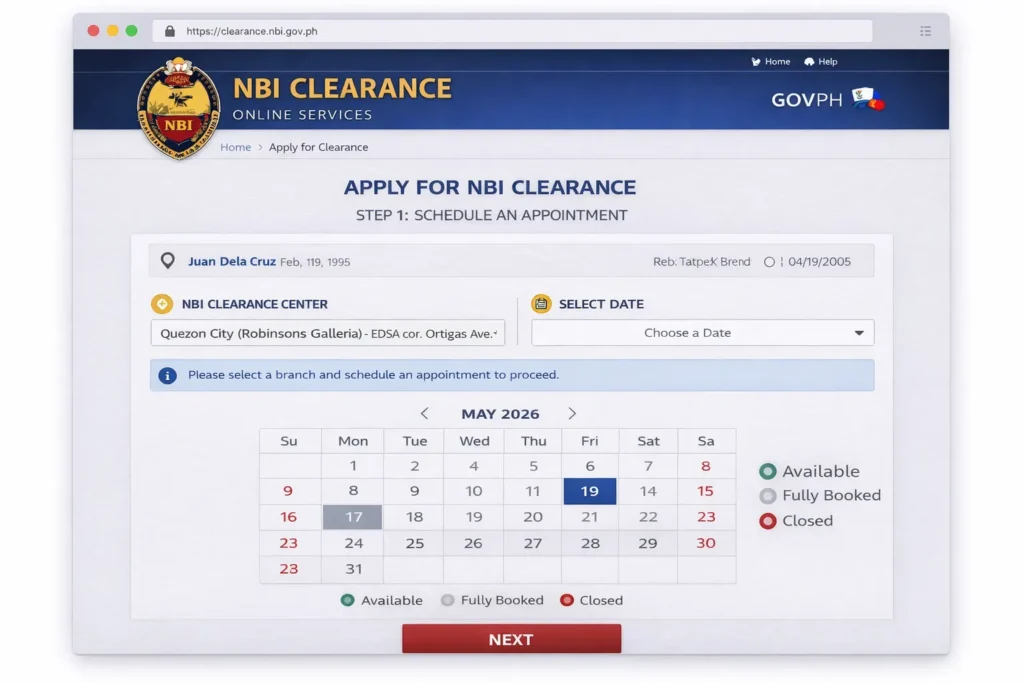
Step 8: Choose Appointment Details
Select NBI Branch:
Dropdown Menu Shows:
- All NBI main offices and satellite branches
- Organized by region (NCR, Luzon, Visayas, Mindanao)
Popular Branches:
- NBI Main Office (Taft Avenue, Manila)
- Quezon City Regional Office
- SM North EDSA (mall-based)
- SM Manila
- SM Megamall
- Provincial offices (Cebu, Davao, Iloilo, etc.)
Choosing a Branch:
- Choose nearest/most convenient
- Mall branches: parking, AC, but more crowded
- Government offices: faster but basic facilities
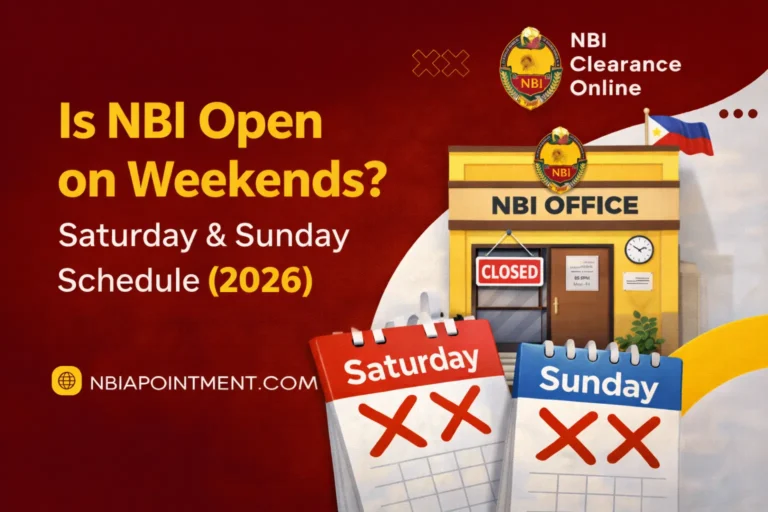
- Saturday available only at select mall branches
Select Appointment Date:
Calendar View:
- Green dates = Available
- Gray dates = Fully booked
- Red dates = Holidays/Closed
Date Selection Tips:
- Book 2-3 weeks in advance (best slots)
- Tuesday-Thursday = least crowded
- Avoid Monday (busiest day)
- Avoid Friday afternoon
- Saturday = very crowded (limited branches)
Select Time Slot:
Morning Session:
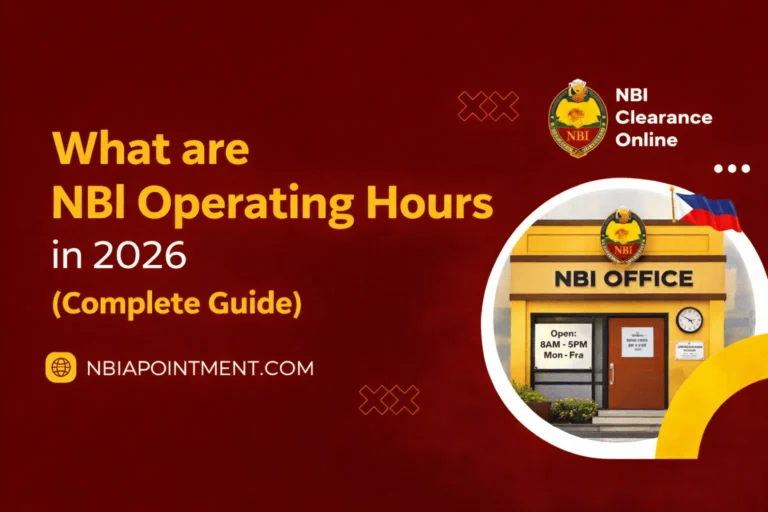
- 8:00 AM – 12:00 PM (government offices)
- 10:00 AM – 12:00 PM (mall branches)
Afternoon Session:
- 1:00 PM – 5:00 PM (government offices)
- 1:00 PM – 7:00 PM (mall branches)
Best Time Slots:
- 8:00-9:00 AM (first batch, fastest)
- 2:00-3:00 PM (after lunch, moderate)
- 10:00-11:00 AM (mid-morning, okay)
Worst Time Slots:
- 11:30 AM-1:30 PM (lunch time, slow)
- 4:00-5:00 PM (nearing cut-off, rushed)
Confirm Appointment:
Review Screen Shows:
- Your name
- Branch selected
- Date and time
- Application reference number
Click “Confirm Appointment”
You’ll Receive:
- Appointment confirmation on screen
- Email with appointment details
- SMS reminder (if mobile provided)
- Reference number (SAVE THIS!)
Reference Number Format:
- Example: NBI-2026-02190001
- You’ll need this for payment
Step 9: Proceed to Payment (Optional Now)
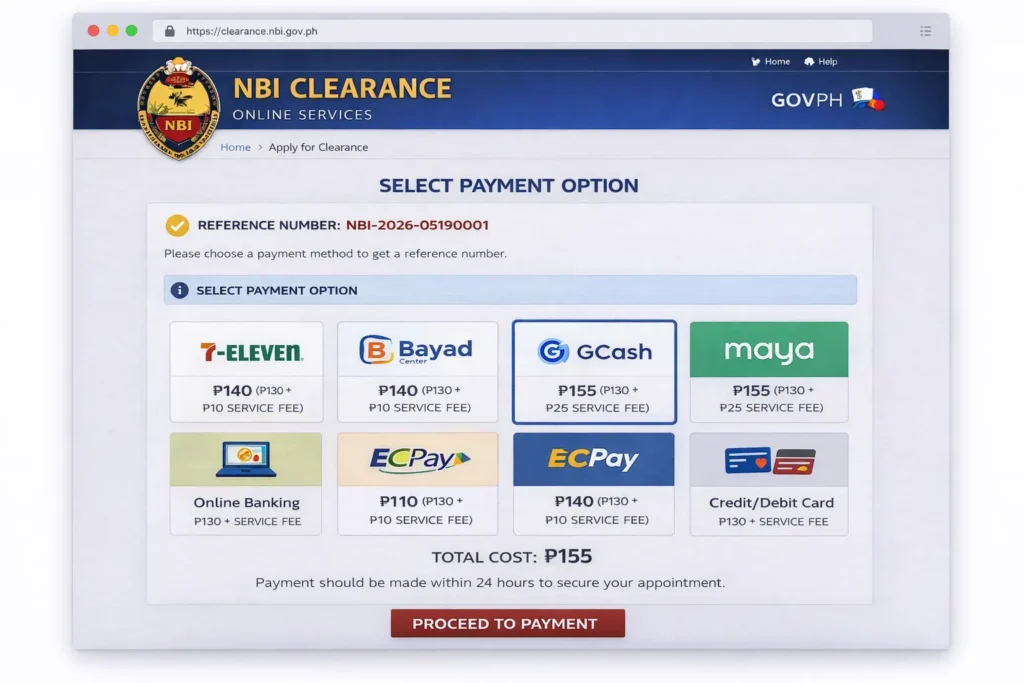
Two Payment Options:
Option A: Pay Now (Recommended)
- Secure your appointment
- No risk of forgetting
- Confirm booking immediately
Option B: Pay Later
- Pay up to 24-48 hours before appointment
- Flexible but risky (you might forget)
- Unpaid appointments may be canceled
Payment Methods Available:
- GCash (₱155)
- Maya/PayMaya (₱155)
- Online Banking (₱150-160)
- 7-Eleven (₱140-145 cash)
- Bayad Center (₱140-150)
See our guide: [How to Pay NBI Clearance Online (All Methods) →]
What Happens After Registration?
Immediate (Same Day):
- Account created and verified
- Application submitted
- Appointment scheduled
- Reference number generated
Before Appointment (1-3 Days):
- Pay the ₱155 fee (if not paid yet)
- Prepare requirements (ID, receipt, proper attire)
- Note branch location and appointment time
Appointment Day:
- Bring: Valid ID, appointment slip, payment receipt
- Arrive 30-60 minutes early
- Complete biometrics (photo, fingerprints)
- Takes 30-90 minutes total
After Appointment (1-10 Days):
- Wait for processing
- No hit: 1-3 days
- With hit: 5-10 days
- Claim clearance at same branch
Common Registration Problems & Solutions
Problem 1: “Email Already Registered”
Cause: You (or someone) already used this email
Solutions:
- Try logging in (maybe you forgot you registered)
- Use “Forgot Password” to reset
- Use a different email address
- Contact NBI if you think someone used your email
Problem 2: “Invalid Date of Birth”
Causes:
- Selected future date
- Format incorrect
- Too young (under 15) or too old (over 100)
Solutions:
- Double-check you selected correct year
- Use MM/DD/YYYY format
- Must be at least 15 years old to apply
Problem 3: “Email Verification Link Not Working”
Causes:
- Link expired (24-48 hour limit)
- Already used
- Browser/connection issue
Solutions:
- Check if you already verified (try logging in)
- Request new verification email
- Try different browser
- Check spam/junk folder
- Wait 5 minutes and try again
Problem 4: “Registration Form Not Submitting”
Causes:
- Internet connection lost
- Browser timeout
- Missing required fields
- Special characters in text fields
Solutions:
- Check internet connection
- Refresh page (data usually saved)
- Ensure all required fields (*) are filled
- Remove special characters (é, ñ, etc.) if causing issues
- Try different browser (Chrome, Firefox, Edge)
Problem 5: “No Available Appointment Slots”
Causes:
- Booking too close to desired date
- Popular branch fully booked
- Peak season (January-February, May-June)
Solutions:
- Book 3-4 weeks in advance
- Check different branch
- Check daily for cancellations
- Try weekday instead of Saturday
Tips for Successful NBI Online Registration
Before You Start:
- Use computer/laptop (larger screen, easier)
- Stable internet connection
- Have birth certificate ready (for exact name spelling)
- Have 30 minutes of uninterrupted time
During Registration:
- Use Chrome or Firefox browser (best compatibility)
- Enable cookies (required for website to work)
- Don’t use public Wi-Fi (security risk)
- Save your password somewhere secure
After Registration:
- Screenshot/print appointment confirmation
- Save reference number (text file, note app)
- Set calendar reminder 1 day before appointment
- Verify email address immediately
Common Mistakes to Avoid:
- Rushing through the form (leads to errors)
- Using nickname instead of legal name
- Not verifying email (account won’t activate)
- Booking too close to needed date (no slots)
- Forgetting to pay before appointment
Frequently Asked Questions
How long does NBI online registration take?
Registration takes 10-15 minutes. The entire process (registration + scheduling + payment) takes about 20-30 minutes total if done in one sitting.
Can I register for someone else?
No. Each person must register using their own email and personal information. However, you can help guide someone (like a parent or elderly person) through the process. For minors, parents can register on their behalf.
Do I need to print the registration confirmation?
Not required but recommended. You can show the appointment confirmation on your phone, but having a printed copy is safer in case of phone issues.
What if I made a mistake in my registration?
Minor errors can be corrected during appointment. Major errors (name spelling, birthdate) should be corrected BEFORE appointment by contacting NBI or creating new application.
Can I change my appointment date after registering?
Yes. Log in to your account → View Applications → Cancel → Rebook new appointment. Do this at least 24 hours before original appointment.
Is online registration required, or can I walk in?
Online registration is required. Walk-in appointments are no longer accepted at most NBI branches. You must book online first.
How much does NBI clearance cost?
Total: ₱155 (₱130 base fee + ₱25 e-payment service fee). Slightly cheaper if paying cash at 7-Eleven (₱140-145).
What if the website says “under maintenance”?
NBI website occasionally undergoes maintenance (usually announced). Check back after a few hours or the next day. Scheduled maintenance is usually late at night.